Unit 10 - Rigging
The object of this unit was to work using Maya (or similar programs) and create a working rig of a mech. This can be a body mech or one people could use in movies/novels as forms of transport/assistance. At first we will learn working with IK handles, auto-rigs and how to create ik handles and joints for our mechs and other models we import from MudBox that we'll work with.
Test Rigging


I have imported a pre-created model of the human body from MudBox onto Maya. After selecting it I used the auto rig option as seen above to create a skeleton inside it. The skeleton is seen on the first picture and allows me to select certain parts of the body such as the wrists, arms, head and move them around, changing the position of the model. An example of me playing around with the human model can be seen on the last image where I gave them a pose and took a picture.
The human body skeleton has a tons of joints to play with that the program is used to except the fingers, which I could add on my own using the "add joints" tool. There were essentially little to no problems with this skeleton and kept in shape no matter what pose you gave him. The model can also be dragged by its waist and then it's entirety moves up or down, in a satisfying jumping sequence. This is because his legs bend once they touch the base plane on Maya, dragging him below it will twist and bend the body.

I then imported the t rex model that was already made on MudBox. I imported it as a new scene at first, which got rid of the human model. As seen on the left image it is much harder to use it's skeleton after you rig it. The program tries to see the T Rex as a human body and gives it a fairly simple skeleton which doesn't include it's special features such as the tail. The limbs are much harder to move and manipulate because Maya is trying to give it a human skeleton which works in a different way. The T Rex ends up looking like a Pterodactyl instead when his arms are moved up.
I then opened up MudBox again and imported the human model alongside the T Rex.I was unable to move both models at the same time since the skeleton rig only worked on one at a time. I firstly positioned the dinosaur then made sure the human rig was moved into a suitable position. As seen on the left image that was the final result of how the two models looked when put together.


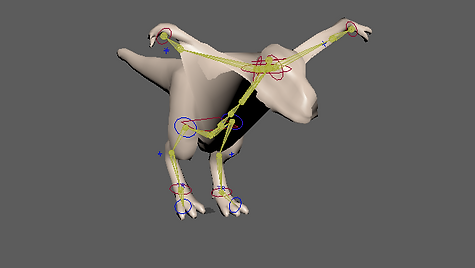
Lastly during my first lesson of rigging, I have imported a lizard model from MudBox into Maya and had to give it a skeleton. The usual rig option did not work on the lizard at all since it's form is so different from a human body's, in result it confused Maya. I used the X Ray tool to make the lizard model more see-through as seen on the images above, as well as used the Create Joints tool to create it's skeleton. The skeleton can be seen on both images as well and is the rainbow lines that run through the body, each end representing where I can move his body just like with any other rig.
After setting up the basic skeleton in all parts of his body such as the tail, legs, head and spine I was able to easily move him around like the image on the right shows. It was much more detailed than what I could do with the human model of the T Rex since It had many more joints that I included. The create joints tool is very useful if you're trying to create characters of complex actions, since they allow you to also create joints in the fingers or tail which normal automatic rig doesn't do even with the humanoid models.
Mechs in media
I've researched recent game and cartoons for any good concepts of models inside mechs or with mechanical parts that enhance their natural abilities. A great example of a character with mechanical limb enhancers is shown on the right. Mei from Boku No Hero Academia, As you can see her entire body is suited with all types of mechanical add-on's but the ones that mainly catch your eyes are her legs. She has a rather simple yet suitable design since she doesn't control them with her hands like people usually do in cabins of their mechs. They had to be light and portable.
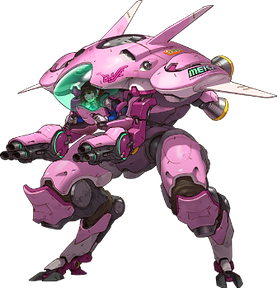
However it wasn't the ideal mech that I wanted to include in my project, instead I wanted something that'd be the focus of the audiences eyes and be much bigger than its user. The next example I looked at was D.Va from Overwatch who has a full-body suit of mech that she's constantly in while on the battlefield. This example is presented below the picture of Mei. D.Va's mech is a huge spacious suit of armour inside which there is a cabin with controls. The mech has a humanoid form; with a pair of legs and hand and no tail. It's legs are shaped after a rabbit and have more joints which undoubtedly take more rigging but I do love the idea of taking a theme of a rabbit and girly colours and incorporating it into the whole design, making it unique but still usable, with many weapons incorporated that the user can use from behind the tough window shield.
A design by an artist that I found on deviantart has also caught my interest. It took a quite interesting spin on mechs by basing their one off a brand, Monster Energy. Using the claw marks on the energy drink's logo as inspiration for their whole mech as well as character design. I loved the concept of taking something mainstream and popular and turning it into something new and refreshing such as a mech. It instantly catches the viewers attention because it is something they're familiar with. I wished to incorporate this concept a lot into my mech later on.
The final mech that I looked up was also used in a game similarly to D.va's mech in OverWatch. This mech came from the character Bedman from the Guilty Gear franchise owns a mech that he is literally striped to. The mech, fitting the character's name is in shape of a bed, with incorporated hand and extra bits of gear. I find this intriguing and very original, especially since it's so far from being a mech it's a surprise it's considered one.


Ideas
Body Mech

Octo-Mech

Bird-Mech
My first idea was quite simple and easy to execute. I wanted to create a mech which was very much like the human body, structure wise; with two arms and legs in a standing up position. It'd be a battle mech like the ones you usually see in Star Wars or Fallout. It'd have a pilot operated mech with spare in the large middle section for the pilot. Since the pilot would have to be seen for my unit I would make the glass see through, yet explain it is in fact bullet proof. I would style it after examples of mechs I saw in games and movies, one of good examples of popular mechs would be the ones used in Avatar or Star Wars, I could look at their concept art to get ideas on how to model it and how it should move so the final video will look natural.
Rigging this model would be quite simple since its body would be modeled over a human one, meaning that auto-rigging might work on it and I'd have to only add its fingers and toes to move properly. It would also be easy to research into how to rig this model since most people who do tutorials do humanoid creatures instead of their original concepts. I'd say that the only throw back of this idea is how simple and unoriginal it is in my head and how I think it'll take a long time to model all the parts as well as choosing which shows to actually research for it since there would be so many options to choose from.
My second idea was to create a mech based around an octopus. I had little concept of the size of how it would properly work however I had two main ideas. One of my ideas was to create a tentacle contraption that a person would mount/sit inside of and control from inside. It would requite me to definitely model the human that would be inside it, since they would have to be moving it. Rigging this idea would be challenging since the tentacles would be quite small and I would have very little references to go off of when creating concept sketches for it and rigging it. Another problem I could encounter while following this concept is running easily out of time with both the model, rig and trying to sculpt the human all at the same time.
The second idea I had was to create a large octopus model, similar to the Body Mech, that would be enormous and controlled from within, possibly large enough to be a ship that could contain multiple people inside it at once. I'd be able to model it entirely like an octopus however the problem with how I couple possibly rig it would stay. I would have t observe live octopus on how they move since they do not have normal bones like us humans do and are very flexible features all round. The only part of its body that I could keep solid would be its head that'd be instead the station for the occupants.
My third and final idea was the create a mech around a bird of my choice. Birds vary from us a lot anatomically, similarly to the octopus, however their bones are pretty similar with the exception for their wings. I could choose between creating a bird mech that is ride-able by humans and would requite a saddle or a giant bird that is, similarly to the octopus, a ship. There are a couple tutorials and concept art already existing on mechanical birds, so it wouldn't be too hard to research it in media or look for helpful rig tutorials, although I would most likely try to make it as close to a humanoid rig as possible, without making its wings, and instead putting in monster like arms.
Some examples of birds I could look into are ones from Legend of Zelda and Pokemon since I wouldn't be going for a very realistic model but still quite detailed outside. If I made it ride-able I could possibly make it a sentient being that controls itself like a normal bird and have it be inspired by some birds in games which also have a mind of their own, again same examples as previously apply.
There would be little to no problems with modelling, rigging nor researching this and that is why I chose in the end to go through with this idea out of all of them and because I found it quite original to have a sentient animal mech that would roam the world and if it was put into a game the players would have to catch it.
In the end I have settled for the bird mech idea since it seemed both challenging and unique in execution. I looked around the internet for any inspirations I could possibly gather for my mech and was surprised to the sheer amount I could find. I wanted my mech to be targeted towards older audience or young adults, people who would also be into similar franchised as I am to make it easier for me to relate to the viewers expectations. Because of this I looked for inspirations in places I knew I'd find them, video games and movies.
I firstly visited my first favourite game franchises, Legend of Zelda and Pokemon. I did love the design of ride-able creatures in LOZ, their design was very colourful and feathers on the top of their head seemed very appealing in design. However I knew that feathers would be very complicated to create in a 3D model using Maya. Looking at my other game-inspiration, Zapdos from Pokemon I fell in love with the concept from the moment I saw its design. The spikes that were used for its model I knew were possible to create with the programs I had at hand and that they created a great impact for the bird to look powerful and strong. The only problems I had with his designs were the legs, the original concept art of him wasn't a good example of how bird's legs actually look of how I wanted my model's legs to look by the end of this unit.
I moved on from looking for inspiration in games and went on to studio ghibli movies where I found a ride-able bird model with ideal legs that I had in my mind for the model, it's legs having a typical bird structure where the knees point inwardly instead outwardly like humans. This model also gave me the perfect idea of making my model designed specifically for riding. However all these ideas came from kid-friendly franchises, not something I targeted my audience as, because of this I went a bit further into my research and looked at the black plague doctors. Their masks were inspired by bird beaks, a theme I have already went with. To make my mech more fearful I also decided to take inspiration for it from their outfit.


Inspirations For Final Idea


Parent Constraints And Utility Nodes


In Maya we modelled a simple hand, with three fingers. We moved each pivot point of each part of the cubes below them and then made sure to connect the two right fingers to the rest of the hand using parent constraints then the left one so that the two fingers moved together and separately from it. I opened the outliner box as you can see above on the screenshot and made sure to move each cube under different cubes to make it reliant on it.
From then on moving the hand into interesting positions was quite simple and easy; on the video I uploaded on Vimeo of the final animation that was created by Maya between the two main scenes; when the hand in laying down like on first picture and when it's pointing (Scenes are made by simply pressing S and dragging them on the timeline. There are little to no problems with this technique when all parts are originally separate and then moved into positions, except when the cubes are moved into much more straining positions they can go through other cubes like in the final scenes of the video, since this model is very simplistic it doesn't take away from anything but it's something to keep in mind when making more complex designs.
IK Handle


IK handle technique is what I used on my models of the lizard that I presented earlier on the website. I have already created his skeleton previously and used the x ray tool to make him see through. I was then able to select a single of the points on the leg (At his hips) and while pressing shift also clicked one at the end of his toe. I then clicked the "Create IK Handle" option, as seen on the last picture, which allowed me to select them again and make a bond between them. This bond changes the colour of the skeleton inside the limp that was selected and makes the limb act much more naturally. You can lift it up and move it around much easier than if you had to select every bit of the skeleton separately. I later did the same to the rest of the legs and the tail.
The video above showcases the difference between moving a limb affected by the IK handle and one that has not been. As you can see the IK handle allows for the whole limb to move more realistically and the leg ends up in realistic proportions by the end pose whereas without the Handle the other arm simply moves away, as if I was playing with clay, ending up in unrealistic positions and proportions.
Concept Art

These are basic sketches that I will be going off of when designing my mech. They took inspiration from all of my research and ideas that I wrote about above. The mech is obviously inspired by a bird, I didn't have a specific been in mind when I was designing him however looking back at it I imagine he looks slightly like a crow. I tried to make I look both machine-like as well as still keep specific things that make it look smooth and animalistic/cartoony. One of those things being it's eyebrows and another it's tail and feathers on the back of the head, which were admittedly, inspired by Zapdos from Pokemon.
The human rider design was inspired by the legend of zelda franchise as well as the doctors who are associated with the black plague and would wear beaks around their mouths. I wanted very much to see the rider in theme with the mech that is why I chose this design out of any other possibilities.
Inside you can see I have also included small lines connected with dots, this helps me estimate how the inner skeleton will look once I finish it although undoubtedly it will be more complex once I finish it, with the lines dragging into each of the claws and, hopefully, eyebrows, allowing me to create more complex movement.
Although I might not be able to model both the bird mech and the doctor model, I am hoping to get the bird mech to work in time along with its handles and getting a video of at least its beak, hand and leg moving in a cycle. During my progress the final may vary from this concept sketch since I'll try to make the tail and head more spiky to make it more obvious I took inspirations from Zapdos, the Pokemon.
Process Of Making


I began working on my model by starting off on the legs. I considered them at the time the most important, mechanical and easy thing to create since I was able to easily duplicate the first one I created and made an exact copy to match it as seen in screenshot three/three. I gave my model 3 claws at the front and one at the back just as shown on my sketch and my research. I am planning to give each a separate rig but hopefully also connect them with a handle.
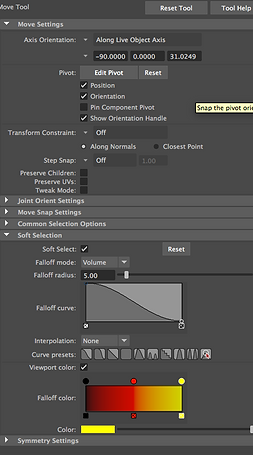


I then started working on the body and tail of the bird, figuring out that to get a more smooth texture I will have to go into tool settings and use the soft selection tool which gave me the opportunity to use a new tool. This helped as well as slightly crippled my project since although it allowed me to make more changed to my projects and its parts, it also made it look far less like a mech and more like a normal bird toy. Nonetheless, I continued to use it throughout the project since it helped with smaller parts that even in my sketches I didn't draw out as mechanical. I decided to make a simple outline of the tail and connect it with a mechanical part similar to those that connected the legs before starting to go into details with it I wanted to work on the rest of the body to at least have its basic shape outlined in case I had encountered problems with timing and had to do a simpler version of my sketch.


I then started to sculpt the beak of my bird model. Using the soft selection tool I made its simple outline before using the booleans option to separate the beak into two separate parts, thus making it finished. I also added a simple oval for the head as seen on above screenshots to see if the beak would suit the look, after I made sure it did I was able to work further on the head, making it less round and more realistic.


After altering the head shape using the soft selection tool I added two cubes which I used a simple drag tool to alter to create sticking out antlers from them. I made them more spiky this way and found a simple and efficient way that I could later use for the tail and head so it'll be similar to what I originally planned for my concept art. Instead of eyes I gave the bird two ovals that acted similarly to snipers aiming view, to give him a more mechanical feeling and make it look a bit less like a soft toy.
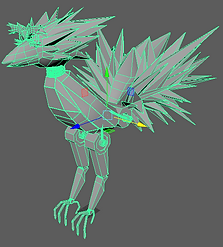


After changing the look of both its head and tail into more spiky versions, I added rings that acted as its neck as seen in screenshot one. Afterwards I created his arms, creating them with a simple process that I used to create his legs; creating one fully first before moving onto the next. I then started creating joints and adding IK Handles to the model while working on it. Connecting all the parts to each other one by one.


I continued working on the IK handles until all were connected and working properly. I had to connect all of the fingers to the mechanisms connecting them and the arms/legs, before moving on with the rest however I naturally started off by creating the rig in its main body and then creating a sort of 'collarbone'.
This is a test playrun I did of my model moving. I used keyframes to get it to move throughout the video. It was interesting to finally see my efforts pay off in this video as you get to see most of what I planned to move do an action; beak, leg and arm. Unfortunately I wasn't able to get the rig of the upper beak to move however looking at most birds I came to notice that similarly to human jaws; their upper jaw isn't the one moving.
I also wish I could have moved both arms and legs however instead I chose to move only one of each since the IKHandles on the right side of the body didn't allow the middle fingers to move from their place and instead just stretched them. For the final video I hope to show off this animation however without the IKHandles and rigs showing through the model of the bird since it makes it look much less professional.
Final Video
This is the final video I uploaded to Vimeo of my project. I hid the IK handles and the rigging in the options to get a cear video of only the mechanical bird that I created and its movements. Overall I am quite happy with how it turned out, especially considering it kept close to my original idea. I only wish I added a saddle on it so that the viewer could see it was supposed to be a mount.
Evaluation
The theme of this unit was to create a rig around our original idea and make it move using IK handles, rigging and parent constrains. I thought it was a very interesting concept with many possibilities. The part I found most fun about the project was researching mechs as well as learning about rigging using mudbox default models. I have experienced a lot of new techniques such as auto-rigging, rigging, IK handles, parent constrains and utility nodes. A technique I'd like to develop further, out of these lot, would certainly be rigging and overall using it in future projects.
Throughout this project researched many games and shows, looking for inspiration for my model, such as legend of zelda (game) or boku no hero academia (anime). They influenced my work visually since my model was based off their work and examples provided. Techniques I enjoyed using the most throughout the project were using rigging and creating the final rig of my model. I feel like my research and model are the two most successful parts of my work since they kept close to what I imagined it to look like in my final idea. While creating my project I encountered little to no problems except some riggings of my model wouldn't move correctly, because of this those parts of the model did not move (for example top beak). If I chose to do this project all over again I would definitely choose a bit of a different idea instead of basing my entire mech around birds. I'd have liked to make it a bit more challenging; for example by using a harder to rig animal such as an octopus.