Unit 6: An integrated approach to a 3D problem solving in art & design


Idea 1: Chandelier
Idea 2: Blender


Idea 3: Consoles and arcade machines


Model


Changes/Improvements


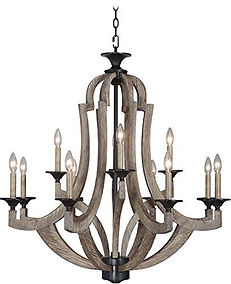
My first idea for the project was to create a chandelier. The design of a common one is still rather complex if I was going for a more modern model. However the complexity of it is what makes it perfect for this project; there are many possibilities that in the end can be achieved by it being so puzzling. For example although all the chandeliers on the right have their candles be out in the open, it is not uncommon to see ones where they're in a half closed bowl that keeps all the wax, and as seen on the last picture they often have pendants, or ornaments sticking out.
My idea for what to do to change the design was initially to create a chandelier with disguised weapons that one everyday basis would act as accessories, this idea was later scrapped since the only round weapons that came to my mind were grenades which would stand out too much and would be hard to activate on call with a simple press of a button.
My second and final idea for the chandelier was to make it a 'portable' light source. By allowing two of the branches on each side become legs which mechanically would follow anyone as it registers the command (something simple like a clap o a click of someone's fingers). Their legs would allow it to follow someone for spying purposes as it'd undoubtedly have an installed camera. While in it's deactivated mode it could lay on the ground and the host of the house could simple say it is broken while hiding its true purpose.
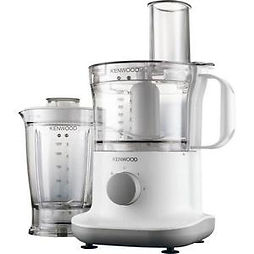
My second idea was to create a rather simple blender design. The usual designs of blenders look as seen on pictures on the right, in most common cases having glass or plastic in the middle which is see-through. Modelling such a product would be a new experience for me as I have never used a texture which would allow you to see through it.
The possible changes that I could have made to the design was an addition of limbs and animal-like characteristics. Using friendly looking animals' characteristics would make the blander look harmless and more friendly while hiding perfectly its real functions such as a camera/poisonous gas activated by turning the handle.
The possible animal characteristics I was considering for the final product were rabbits/cats/dogs/hamsters. I took them mostly into thought because their features are quite simple to model (tails.ears and possibly other limbs such as legs) and also because they are the most common animals people keep as pets in their younger years; the designs would bring a sense of nostalgia.
In the end I have decided not to use this idea yet instead take certain parts of it to include in my final product (these ideas being the animal characteristics which I later implemented into the chandelier by making it similar to an eight legged animals such as spiders). I decided to not go through with this idea because I did not have good enough ideas for how to improve on it as the gas would be invisible and it would be too hard for me to model/texture some of the parts, such as the see through texture that would have to be put on the glass container.

My final ideas on how to make the chandelier were to make two changes in total to its original design. The first, and more noticeable change, in the design was the addition of two pairs of mechanical legs that would allow the model to move around the area. As seen below I have taken two screenshots of models other people have done that also had mechanical legs that were not too complex, which I desired in my end result as they wouldn't stand out too much and could be easily hidden or removed (for example for the first image you would just pull out one screw on each side and take them off to make the design seem harmless).

Product Visualisation
This unit is based on modelling an object as realistically as possible While giving it a small twist, almost James Bond style, where the product that I am creating has a hidden factor such as removable limbs/guns/gas. The project has to revolve around an everyday household object such as a kettle or a radio that I will be recreating and modelling entirely in Maya then rendering it using Arnold on a chosen background, making it look as realistic on it as possible.
Product Visualisation is often used by companies and businesses to present/market their ideas off to the world while still not selling or creating the real product. They are able to construct the item using programs such as Maya to model. texture and render them, making them presentable and represent what the final product will most likely look like.


I started modelling my chandelier by creating the middle base from which everything will branch out.
I then added chains on the very top by which the chandelier would usually hang by and some minor details at the bottom.
To create the branching out hands of the model I created a polygon torus then halved it by using the Mesh/Blooleans/Difference tools. I did this to create the curve that chandeliers usually have.
Later I have modelled the candles and their stands on the chandelier by extending and editing the faces of the branches. I have also added 4 additional hands for the chandelier by duplicating. I did this to give the object a more animalistic feeling/ based off of animals like octopuses or spiders.
I tried reversing the legs of the chandelier so that it'd be easier for me to work on them while I create their robotic counterparts which I took the inspiration of from the first research/changes image.
I started off by creating the feet, often times using the Booleans tool to shape them from a simple sphere. I then added a simple square and extended its faces to create the handle.
I repeated the same processes to create the rest of the mechanical limb, end result looking as show in picture above.
Instead of giving the chandelier 8 legs like I originally planned I decided to give it four and make the other half normal parts usually found on a chandelier. I did this so that the original product would still be recognizable even after the addition of the legs.
As planned in my 'changes' section, I have added a small camera to the middle of the base so that the final product was multi-functional. It was a rather easy addition and the square was easily smoothed out using the bevel tool in Maya. Multiple times I've had to readjust the size of the camera so that it wouldn't stand out too much.
My third and final idea was to recreate a console of sorts ( of course with an added James Bond-like twist to it). I've had multiple concepts on how I would change up the typical concept of the consoles, my main one being installing guns inside arcade machines that'd fire bullets out of the coin slots the moment the player presses the play button or allowing the slots to release poisonous gas that's unarm/kill the player as they get through the levels. My ideas for the gas included Nerve gas or Chlorine gas, both of which do not leave a scent behind and are unnoticeable before they start affecting the subject's body.
In the end I chose not to go through with this idea as it was for too complicated an unnoticeable. Of course I could model the guns inside the machines however they would not show in the final renders since they would be inside. Similarly to the previously stated problem, the gases would only be visible using particles which we did not use during this project (they are only available in Unity which we did not use).
Another problem was that a design of a simple console was far too simple to design and had barely any room for improvement in the ideas department. It'd be quite hard to implement any practical or functional functions that the consoles would have other than possibly the gas, which as I stated previously, I could not visualise on the final renders unless I used photoshop to create the illusion.
Secondly I have decided to add a not very noticeable camera to the design. As seen on the third picture below I have found a typical small camera used by detectives or spies to observe and easily hide.

At first I started texturing my product's mechanical legs. Using dark and rusted textures for the feet and connecting circuits to give it a vibe of an old, or rather ancient relics or constructions. For the connecting long handles I used a paler yet still rusty texture so that it would not stand out as too modern or new fro the rest. I then duplicated the leg so that I could save on time and not texture the other three.
I then went on to texturing the branches/ curved handles, using the same material I have used for the feet of the mechanical legs. It proved to be slightly harder than texturing the legs since neither the planar nor the cylindrical views worked to make it go perfectly around the model.
Since I have created the handles and candles from the same cylinder (by simply extending and editing its faces) it proved to be quite difficult to texture them. Thus I had to select each of the faces individually to texture the handles then the candles and finally their wicks.
Inspired by the the images I have found on the internet during my research of robots I have textured the middle sphere of the base design to be darker than the rest of them. I have also made the camera a slightly darker texture for it to be visible on the final renders however in reality not stand out too much from the rest of the design. Lastly I have put textures on the chains at the top (which during modeling I have curved slightly to give the impression of gravity) and gave them the same texture as the dark sphere to balance out the colour combinations.
The biggest problems I have encountered while texturing this product was finding the right textures that wouldn't look too cartoon-like or stand out too much. I have often come across textures that contained too much rust (as I was searching for rusted steel or metal textures) and gave the overall design an unpleasant orange hue to it which stood out too much in comparison to the rest of the textures. Because of this problem I had to use some textures that weren't labeled as the surface I was looking for; for example the darkest texture I used is actually a ground texture that is covered in moss.

Texture ideas
The images I have found that I used as inspirations for my model's motorised legs did not show case what textures the creator later possibly has chosen for the model to look realistic. because of this I have looked on websites such as DeviantArt and Tumblr to search for images of completed robots to get a good idea of that the textures they used would look like (unfortunately I couldn't find a creator that would also list their textures below the image). The first picture actually depicts a 2D drawn sketch created by someone in a digital program, I used it as reference nonetheless because the shading and colours could easily be interpreted as textures and it was very easy to find textures later on that looked similar to that of the picture. The second images model however was completed fully in a 3D program (which the artist did not name in the description however tagged as such). As you can see the second image is much more detailed and shiny because it is rendered whereas the first was drawn and was unable to get such details.
In the end I have decided the texture my model mostly based off of the first image shown. I have decided this because The combination of copper and steel would look very unrealistic on the chandelier and would stand out too much in an everyday setting. Similarly to the first image I have also decided to lay out my textures in similar order; the feet being a much darker tone to the connections, then the middle of the body being, again, a much darker texture and screws and such being in the middle of the two.
Texturing
Final Renders+Solving Problems
My final task was to render my model on a background using the Mental Ray in Arnold. At first I created a square that was used as a base for the product to stand on. I then assigned the square a 'background' texture so that it would blend in with the background no matter what angle it'd be at yet still allow shadows to appear underneath the chandelier.
I then added the background of a school ground to the scene and dragged the model along to my desired position. As seen on the picture on the right my render did not show the shadows of the model on the invisible plane and the model looked very out of place on the school background. I was unfortunately unable to fix this and decided to take alternative routes around these two problems. (I was unable to fix te shadows properly because my Maya's renderer wasn't giving me the options it was supposed to even on different Macs available.
Evaluation
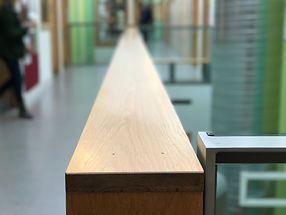
First of all I have changed the background to the one provided to us. It's a background of a corridor and the model is supposed to be positioned in the middle of the wooden fence(as seen on picture on the left). This forced me to change the size of my model from my original plan which was for it to be around the size of a human being (5-6 feet tall) to a size of a small toy (max 1 foot tall). This didn't really cause any trouble as I could simply say the product is marketed off as a toy instead of a full fledged chandelier. The second problem was the lack of shadows in the final renders. I easily fixed this by rendering the model as usual then taking a screen shot of it and editing the picture in Photoshop using the burn tool underneath the picture to create the illusion of shadows. In the end I think it turned out better than the render would if it worked as I had full control over where the shadows where pointing and although did not have the precision of the program, I believe the colours that the Photoshop casts underneath the chandelier have a much better quality hue than the ones in Maya.
One the left you can see my final rendered and Photoshop edited picture of my chandelier. It is rather hard to see all of the details on it as I have also using the blend tool on it's right candles/back legs and top of its base just so that it blended in well with the rest of the photo which has things blurred the further they are from the camera.
Final
The main theme of unit 6 was to create a product with similar functions to James Bond gadgets. The part that I enjoyed the most about this project was definitely researching the different models and textures other people have used to create something similar to my idea but also all the research that was put into small details of the ideas such as the gas which I was unfortunately unable to use. I enjoyed this the most because of how easy yet satisfying it was to find all the small details that were later contributing to my final render. Two of the new skills that I have learned during this project was composition and dealing with problems in unexpected ways. Composition allows you to put pictures in Maya as backgrounds which work perfectly in renders and one of the ways I dealt with a problem in a different way than expected was using Photoshop to create effects and shadows in my final render as I was unable to use the Arnold properly.
The technique that I enjoyed the most during this project was definitely the creation of models as it allowed me to expand on my knowledge further and learn new ways in which I could model things such as using the Booleans tool to get rid of certain parts of the models. I believe also that the most successful part of my project was the creation of the model of the chandelier because of how usual its design came out in the end and how I was able to show my skills in the area by my screenshots. The one thing that I would change would definitely be the final render, which given the time and different equipment, would have been completed in only Maya without the use of Photoshop. If I was able to complete this project again I would change, as previously stated, the programs have used, but also the textures since they did not come out quite as polished and didn't fit in as much as Iw ould like for them to.

Ambient Occlusion
Ambien Occlusion is a rendering option which allows you to create soft shadows in-between your models and make them look more realistic on the ground/surface. The shadows created by ambient occlusion aren't actually created using a source of light but rather by Maya finding surfaces and projecting them onto them, for example if it find no surfaces the area will stay bright however if there is many of them the area will become much darker to create the illusion of shadows.
To create the ambient occlusion render I simply had to select both my model and the plane then use the new material option and assign the Arnold Shader called 'aiAmbienOcclusion'. After this the render came out nicely and the shadows as seen on the left are subtle yet clear in the image.