Unit 7: Freerunner
The first task I got was to create a world in Unity with a simple terrain. I imported in from the 3d folder. The terrain first appeared as a blank surface which I later used different tools on to make hills and bumps. I then used the paint brush tool and the different environment paints to colour in the plain surface.
I used grey, brown and green tones to many the environment realistic and not overly bright or dull.
On the spots where most of the green paint was used I have added trees which I imported rom the environment folder. Since the choice was limited down to three simple tree samples I have used them all in different parts of the terrain.
The more city like trees were used where the terrain was coloured in green (also suggesting where later the grass will be placed) and simple single palm trees were where the more isolated parts with no grass have been found.


After putting in the grass and also water (where I made a hole in the ground) I have put down the FPS camera which acted as the character I played as in the small map. The hills acted as perfect climbing spots but also as perfect stop point, showing the end of the map and where the player shouldn't tress pass to.
There were slight problems with both the grass and water when I first used them. The water didn't recognise where the ground has ended and instead ended in mid air or completely disappeared once the camera 'stepped' in it. Because of this error I had to deepen the hole I created for it and also had to avoid any contact with it. The grass had a similar error where it would disappear in distance or while you stepped on it. To get rid of these simple problems I simply had to delete these elements, re start the program and put them in again.
After making sure all of the environment models worked I took screen shots of the finished terrain. While moving around I have noticed how easy it was to move around the environment but also how shaky the camera was and how limited my options were without any further coding; the only things my character was able to do was walk around by using the wasd keys, sprint when you pressed shift and jump if you used the space bar. I realised that for my final project I might be required to later use codes because my character otherwise won't be able to climb up ladders or make the jumps (therefore I should code in a double jump later on unless I make the gaps between the two destinations (buildings) quite small.
Using Unity for the first time
Transferring fbx models and textures
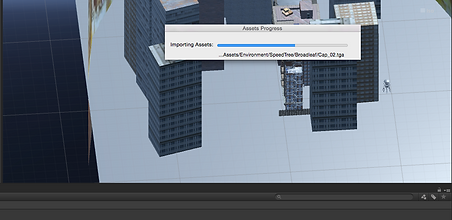
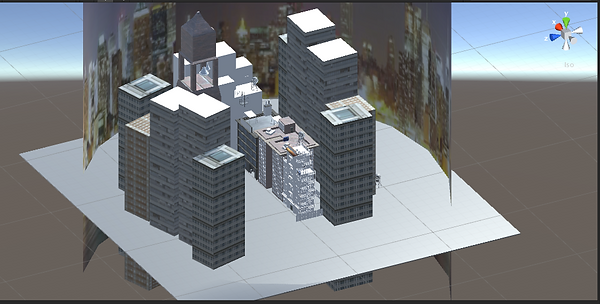
After importing the Maya models into Unity I have come to notice that most of the textures were gone and the models were pure white. After a short while I have noticed the error (caused by the models and folders containing the textures to be in different places) I was able to put back on most of the images.
Other than this I have found no problems with the transfer as all of the models have spawned correctly and when I inserted the fps camera, the character was able to perfectly move on every solid object. The stairs however, proved to be quite tricky as on one case the player has to maneuver his way in a specific way otherwise they are unable to pass through. This error is cause by a pipe that's supposed to simply be there as a way to support the structure up yet unfortunately instead blocks the players way even if they do attempt to jump.
After finally putting on the textures and testing the area around which the player will run and jump, I have come to notice a couple small mistakes I have made when creating my map. For example there is a jump from the first to the second building, and if the player miscalculates the lading they may get stuck in a below area which they are unable to come out of, resulting in them having to restart the whole level. While designing the map I have not thought this plan through since the area contains a ladder, however it is impossible to use it without further coding. The level contains another ladder however this one the player can easily jump through as it is positioned at an angle which allows it.
Some of the images I have used for the level were erased and I was unable to find them. Because of this there were a couple small models I had to delete from the final product.
Skybox
To add sky around the map and a slight change in tone to the look of things I had to add skybox. To do this I had to sigh up to Unity and log in with my made account. I chose one of the free skyboxes that had high ratings to make sure it was working and wouldn't be difficult to import or use.
The skybox I chose at first required importing as it was an assents pack. At this point I've discovered a small problem with my unity which was that each time I wanted to import a new assets pack, I had to save, close and open up again the whole program and I had to repeat this each time.
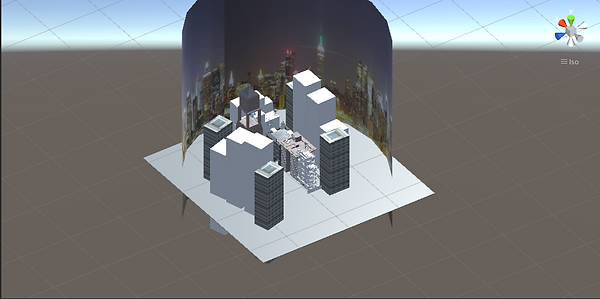
The sky that I have imported was that of a night sky. Unfortunately it wasn't very suitable. The texture that it put was repeating itself (the image of the moon) and the glow that it gave off on the rest of the buildings wasn't quite the look I was going for, quite the contrary it was dull and made the scenery look toxic.
As you can see through the cracks in the ground you can see the repeated image of the moon. The radience given off didn't resemble the night sky and so I have decided to change it and my plan from making the map take place during night to making it during the day so that the sky was bright blue and gave off a cold glow on the rest of the level.
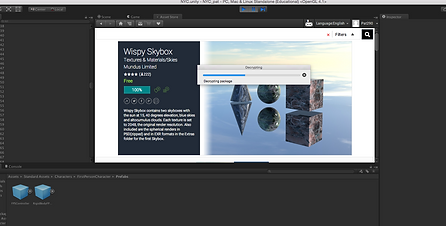
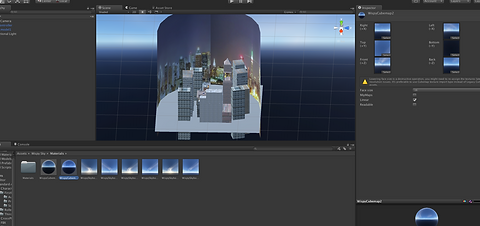
The second pack that I have imported was the Wispy Skybox. I chose it because is as highly recommended by someone I know in person who was also working in Unity. Just as I have planned the skybox was that of a day sky and thankfully, unlike the other skybox, did not repeat itself like a broken texture.
As seen on the screenshot above the sky looked perfectly normal although it did not contain a sun or anything of sorts. I also did not have any problems while using it as the glow it radiated gave off a perfect blue tint for the entire level and its models. In the end I settled with this Skybox texture.
Environment
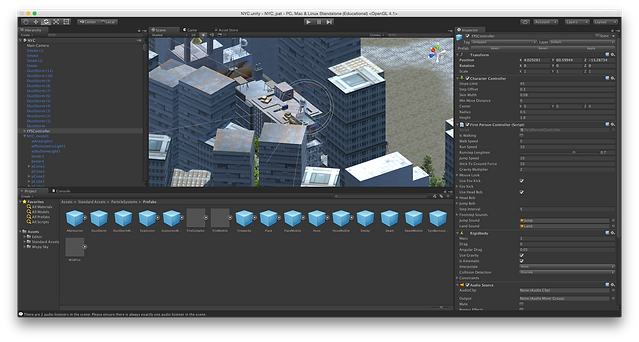
To add the fps camera I had to click into the following folders Assets/Editor/Standard Assets/Characters/Prefabs. I then could place the camera anywhere on the level where I would like for the player to start. I chose the top of the first building that I have created since the path leading from it to the others is quite simple yet still required jumping and movement.
I then added collides so that the spawned player wouldn't just go through every model and so that they were able to actually climb up the stairs and go up and down the roofs of my model of the NYC.
Using the paint brush tools I have selected three different environment textures from the imported folders. To go with the city theme I have chosen simple stone blocks to represent the pavement. However, it is not uncommon for cities to have random parks or patches of grass in the middle of a ring of buildings; because of this I have added the grass texture in the very center of the buildings, making it uneven to add to its realism.
I later imported trees which I put on top of the grass texture and near some of the buildings entrances, since some properties enjoy having them outside their doors for stylist purposes.
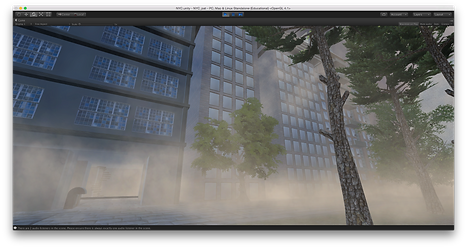
The third and final texture I used was used around the area, around the buildings, as seen in the screenshot below.
To make an obstruction, or rather, to present to the player that a path was unreachable or shouldn't be attempted, I have made a small forest of the three types of trees that were available to me and that fit with the city standards (it would have been rather difficult to explain why a palm tree is is in the middle of New York to the player).
When making test runs I have made sure that the trees where larger than the player (or at the very least his/hers eye level, which makes it almost seem like you're playing a role of a child. I did this by adjusting the scale in the options menu.
I did not add actual grass to the level because I knew that in New York it is a rare sight in the middle of the city and that it would have probably been trimmed or taken rid of entirely (I learnt this from looking at different images of New York in my research.)


Particles
Because of my constant difficulties with Unity, to import the particle folder I had to yet again close and open the entire program. After the particles imported and I tested them it seems like everything has worked perfectly fine.At first I added fog to the ground ; I had to raise it up slightly so that it was not only at the feet of the player but also at an eye level.
I had to drag the fog into the level multiple times, solemnly because it did not spread on a wide enough area that I needed it to cover (only was visible on an area of a single building. I added around 5 more of them at different levels and points to make it look more realistic while looking down from the top buildings but also when looking up or around when the player is on the ground. Overall I did not have any more problems with the fog or particles.
After adding the fog I have added smoke to the chimneys on top of the third roof. The only adjustments I had to make was simply dragging it a bit so that it looked like the smoke was truly coming from the pipes and not from behind, or above, them.
Unfortunately after play testing the environment I have come to notice that the player could not see the smoke from either pipe if they came too close to it. This proved to be a huge problem as it made the scene unrealistic, however when the player stood on a different building it was visible. After further inspection I have left it in the game nonetheless since it created a beautiful effect even if the player was forced to stand far to see it.
I did not have any further problems with the smoke and in later cases of screen shots it is visible.
Adjustments
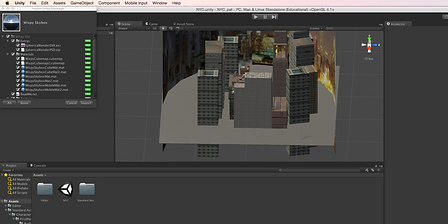
When in game mode I have noticed that there were a lot of things that I could adjust in my level. One of them was that there were many gaps visible in between the buildings. Those gaps showed how empty the space behind the buildings was and it killed the illusion of a full and busy city. At first I have tried to duplicate the buildings I have created over and over again to add volume to the level however when put into practice it made the situation even worse because the player could clearly tell they were the same buildings just in different places, often with no difference at all to them. Because of this I have had to delete them and put only a couple as seen on the second screenshot. This allowed the gaps to be filled yet didn't break the illusion entirely by making the block obviously duplicates of one another.
Another problem I have noticed while doing my first run through the level was that the sky and the texture of the surrounding did not go well together. At first I tried to get rid of it and instead add buildings but since it did not work as explained above, I have instead tried to elongate the texture of the surroundings instead so that it'd give a better illusion of the sky for the player.
After doing so I was easily able to play through the level without worrying about the sky as you look up at individual models, such as the water tower, and didn't have to worry about keeping up the realism and illusion that the game had to covey.
The only problem I found with this method was that the resolution of the image got much worse each time I tried to make the texture longer.
Camera
Importing the camera was quite simple. You simply had to find it in the assets and click on its FPS version. I put the camera on top of the first building that I have created. From there it had an easy access to most of the paths it could take and other buildings, for example the player could turn right to explore the other buildings or to the left where they would explore the stairs and could safely get down on the ground.
I have not found any problems with the camera except for the fact that no matter how high I raised it or how much I changed the buildings the camera always showed the point of view of a child; it was quite low in position and about 3-4 feet off the ground.
Movie/Walk Around
This is a short video that I have taken of the final outcome of the level and how it would work/look in a game form. I have then edited the video because there were many times that a part was unnecessary to the viewers (simply cut them out in movie maker).
I have also added a rather well known song to the end product in hopes that the current obsession and trends would make people more likely to watch it and review it.
I did not have many problems while taking the video. It was a standard process and I had the pleasure to take around 5 different videos of the area then cut them all into the 52 seconds long video.
Stills
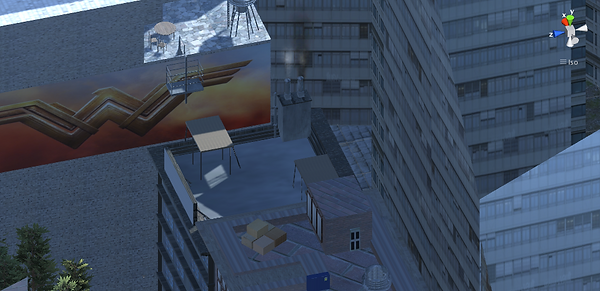
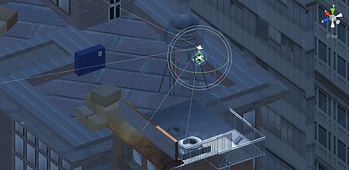
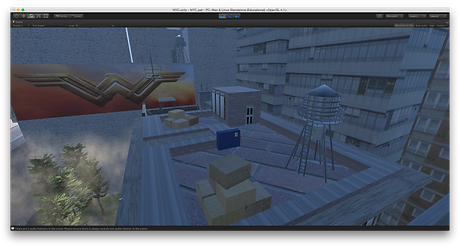
These are my still images from the gameplay which I took while in the FPS camera mode. Each one shows a different part of the level, for example the first on mostly showing off the roof of the second building however concentrating on the water tower as well as the perspective of someone who would be hiding behind the placed boxes.
The second and third showing off the whole roofs yet from different angles. And the fourth being taken from the first roof to show how to player would most likely start off their game.
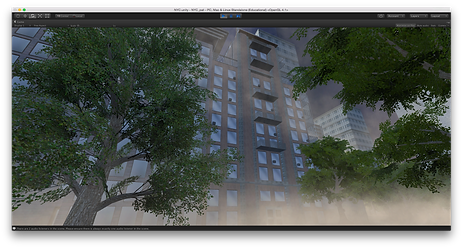
The last two concentrate on the view of the buildings from the ground and how the main buildings would look if the payer too the stairs and went down to see the area.
Evaluation
One thing I definitely have enjoyed about this project was learning a completely new program that worked similarly to the one we have used before (Maya to Unity). It was great to see two programs that have completely different purposes have similar commends to one another and also work together so perfectly, an example of this is how you can import models from Maya into Unity to bring them to live, to add the Skybox and different effects to get the overall model to look the best it possibly can. One thing that I disliked about this project however was the very limited time we had to do it in. Given we had more time I could work in it more and discover even more possibilities that it has in helping me achieve the best possible end result.
I feel like the most successful part of my project was in how I was able to edit the terrain and add to the scenery on the ground level. It was satisfying to use the paint tools to paint the ground and create the grass/blocks instead of simply using a texture in Maya to make everything look realistic and often, very block like. This tool allowed me to play more with shapes and surroundings.
One thing I would definitely improve on was the video of the level that I took. The quality could have been much better and because of the many things I had at the time opened in the program it came out very choppy and that lowered the quality even more.
If I was able to spend more time working on this level in Unity I would have definitely decided to put more time and effort into the video but also the special effects. The fog on the ground could at times get too thick and made it difficult to see, making me have to change the amount of it multiple times. I would have also changed the design of the stairs as it was close to impossible to climb up or down them because of an extra pipe which I added while working on the project in Maya.
Time Leap
The first idea I have had was of the two Korean borders and showing off the live on each side by modelling the capitals of each Korea. The two capitals, named respectively for North and South Korea; Pyongyang and Seoul, vary largely between one another yet keep a similar structure of having mostly flats and towering buildings similarly to New York or other world's capitals. Although the two capitals do not actually meet at the borders of Korean I wished to take a creative spin on the level I was going to create and put them right against one another to emphasize the difference between the two sides of the same country, on which lives in a largely poor yet armed area and the other bring rich yet still quite prepared military wise.
As you can see on the images below North Korea has a dull coloured buildings and overall the atmosphere captured in the pictures paints a sad image of the whole nation whereas the South creates the opposite effect, creating those opposite sides would be quite unique for a level as the player could start of the one side and explore it first before moving onto the other and seeing the difference for themselves.


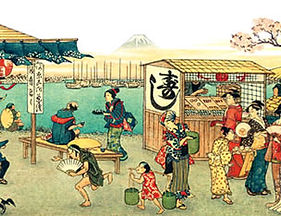
My second idea was to re create Japan during it's Edo period which took place between 1603 and 1868. What interested me most about this period were the structures of the buildings created at the time. All of the buildings were build with angular roofs, at times having a specific one for each floor as seen on the image above. However even in it's less fortunate areas Japan had quite the beautiful scenery to offer, places such as the local markets were often near rivers or mountains giving them a unique look as seen on the last picture below. The era had much to offer in terms of its traditions and would make sculpting easy since a lot of shrines were common to be seen around as well as altars and religiously inspired structures which would fit with the rest of the towns no matter whether I decided to build the capitals or small villages.
The only unfortunate thing about this era is that I was unable to find photographs or overly realistic depictions of the era. Most of the documents were paintings done at the time's most common art styles which was usually done in ink or paints and using a cartoon like style.
Pirate Islands existed mostly for 11 years between 1706 to 1718. They were occupied islands in the Bahamas which were run by privateers-turned-pirates who caused havoc within the trade and shipping industries.
What I find very interesting about this time period is how often it is covered within creative media such as games and TV although it was took place for only the space of mare 11 years. There are many images that are available portraying the huts and other simple structures that were used as well as the small detail that undoubtedly were used such as barrels and docks. The Islands are portrayed to be surrounded by large quantities of water undoubtedly because the pirates had to hide from others and the public eye to keep their trade going. It isn't uncommon however to see some smaller islands around the main one or large rocks surrounding the place.
I chose this as my final idea considering my limited time as well as the many models and ideas I could test with it.
North South Korean Borders
Edo Japan
Pirate Island

Shrine+Experimenting with Ideas
My original idea was to re create Edo Period era (my second idea). At first I started with one of the smaller things I could model for the time which was a simple shrine that was based off of the one shown above in the research pictures of Japan at the time. I found it quite fun to model this however I have taken notice soon that it was taking me way too long to make such a simple model and that it would be impossible for me to make the whole village within my limited time period. Nonetheless I finished the simple model of the shrine first, hoping that it might come in handy for the next idea I have which proved to be the Pirate Island (my third idea).
Unfortunately the file of the shrine did not save correctly and the model was lost. Because of this is I was unable to at least incorporate it into my next idea. However I believe it shows how I was experimenting with different ideas before settling on my final one.


At first I created the simple outlines of the island and added water just like the typical islands would look. While researching islands I have noticed they usually have smaller bits or earth sticking out of the water near them which make their own sustainable environments where people are able to live at times.

 |  |
|---|---|
 |  |
 |  |
 |  |
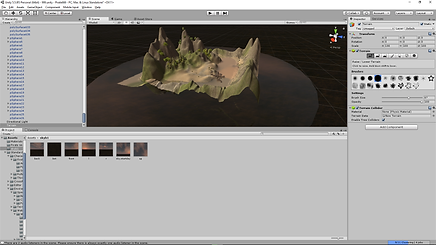


I then added colours by painting the land. I have used a total of three, which were the rock, sand and grass paints to complete the islands, The high peaks being made mostly out of rock and the closer to the water the land got the more sandy it was as well. There was a couple grass patches to show signs of life.
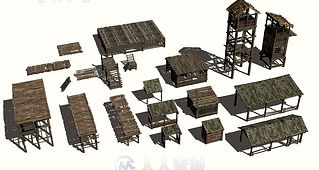
Maya Models+Texturing


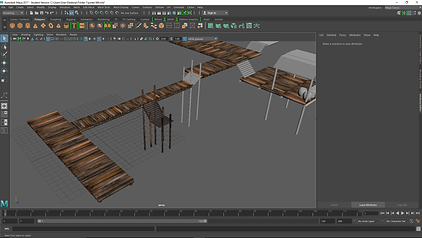
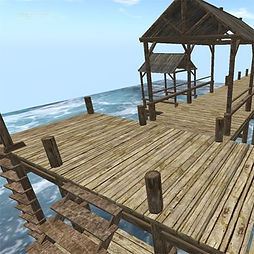
To create my structures I have started off with the dock/port, or more specifically the stairs which would lead to the smaller boats and simple logs which combined made the dock.
I then expanded the dock, making separate ways in which it would branch out leading to different buildings such as the storage space or houses.
On the right you can see I've created a simple open storage space which would normally be used for momentarily keeping tools of trade before they were put on the ship, therefor I also sculpted barrels to represent that.
After I've modeled the most basic things I have decided to texture them. Since most of the docks were copied and pasted versions of the same model I was able to copy and paste the finished textured models and re use them later on.
I have continued to texture the single line of logs using 5 different textures of wet wood that I was able to find online. For realistic support I put two additional logs underneath for support.
Using the scale tool I have at often times changed the longs length and/or width to suit the design of the dock. I have also textured the stairs using their own unique texture.
I have then concentrated on creating the first building. I have decided to keep the concept relatively simple yet creative, The stones being made out of rock to keep them sturdy as well as since the time period took place after the great fire of London it was uncommon to see houses purely made out of flammable materials. I have also textured the barrels/box which would be used for keeping storage of food or drinks at the times.
I then began texturing and modeling my second building, using similar and at time same textures as I imagine the variate would be quite limited ,at the times, of materials. This building had a completely different structure yet still kept its rather sturdy built, having to stand on it's four legs in case of a flood. (It's base had been built slightly higher than that of the first building).
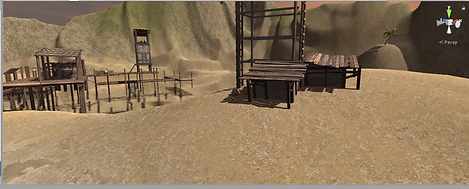
Here I showcase the finished buildings and the slight height difference between their bases which is due to the fact the land will be quite uneven yet they have to be laid on even ground otherwise they would be unstable.
I then textured the open storage space (its roof) and designed a couple boxes which are stored inside, as well as copied some of the previous barrels.
I've also created a barrel/container stand (admittedly quite unstable considering the strong wind and water in the area) since the area around the house felt empty.
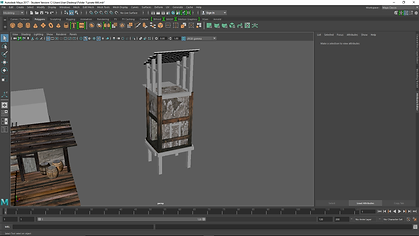
I then created a lookout post. I decided it will stand a top one of the hills later in the Unity map and another will be on the Port along with the other buildings.
I duplicated the first building to add it to another part of the docks, along with a smaller yet more enclosed storage space on a fourth platform.
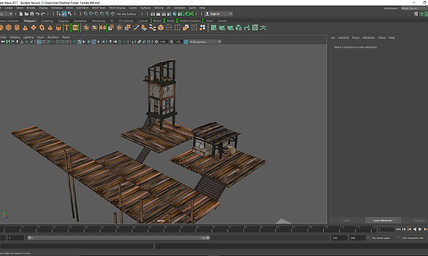
This is the final image of my whole port which I later imported into Unity.
Unity
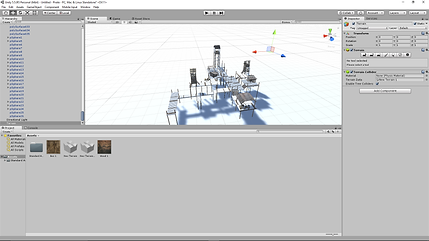
At first I have imported into Unity all the standard assets such as Environment, Character, Camera and Effects. After that I have imported my Maya models, which proved to at first be a struggle since have accidentally saved them as the wrong format instead of fbx.
After checking the collier option in the models' inspector options and importing the 3D terrain I was able to drag the dock into the world map. Some of the textures did not show at first however since I saved them into the project folder it was quite simple to bring them back by searching the textures, by clicking the Albedo option.
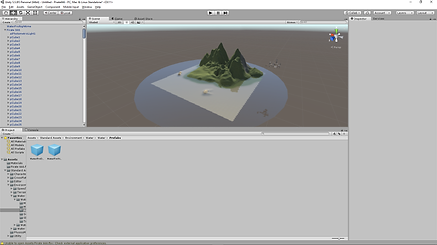
After importing the models I have started the work on the final island. I have waiting to import them first to use the port as an accurate scale of how large things such as mountains can be in comparison (I have changed the ratio of the models nonetheless and made them slightly larger in the end.
Just like in my testing ideas I have made the island surrounded by mountains. I imagined the natural habitat would contain things such as palm trees in the beach part yet also other trees up in the mountains, because of this I made them a greener shade at first.
The body of water grew smaller than initially planned as the mountains around the island spread. I thought it would be quite the good cover for the dock of ships that'd usually fill the place and would make it perfect in case of combat at there would only be one way in or out (it'd be easier to spot an enemy ship yet at the same time it'd be a challenge to win as they'd be cornered.
The green quickly was replaced by more sand and stone as I deemed them more real to the setting than the original full green scene.
Research
Before working on the mountains and terrain ore like shown in the last image I have added a skybox that I have also previously used in my New York project, this was not my final outcome, since I did not think it suited well the scene and the blue hint didn't go as well as other would.
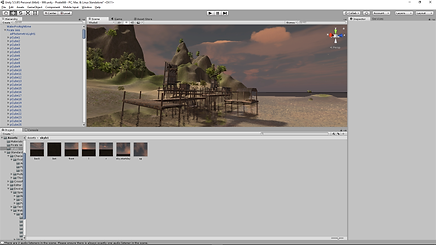
In the end I have chosen the skybox called simple "skybox", it was a high rated one of the sunset which I though gave a good red/orange hint onto my brown/grey models. This is also the final change I have made to the set except for at one point adding a staircase so that the player could actually easily get on top of off the port.
Final Screenshots

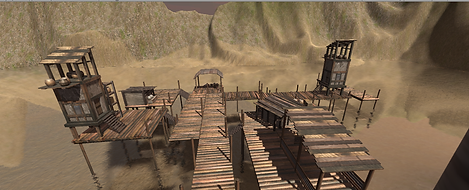
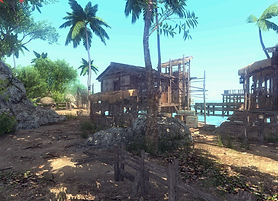
The above images are the final screenshots of the final product of my pirate island. In them I mostly concentrate on the buildings that I have created and let the environment act as a background rather than the bigger park of the picture since I wish to show off where the citizens would live.
Evaluation
The goal of the project was to choose a time period and a place based on it, as we did so we had to create the time period we chose as a game level, in my case that being 1706 to 1718, the golden era of pirates during which many occupied islands where they'd establish their own republic with their own governors. My favourite part of this project was definitely researching the topic I have chosen as well as using Maya to create buildings based off the time era and location. It was quite the shock to find out about the side not often covered by media of piracy, which was that they actually had their own republic and land to call their own for an estimated 11 or more years.
I believe the most successful part of the project was the models I have created based off the research I've done on this topic. It was quite easy to find people's different interpretations of how the islands and buildings were to look as many online,mobile and console games have covered the topic over the years.
The main problem I have encountered while working on this unit was finding the right textures that would go with the setting. Many times I was forced to use the same textures on multiple buildings because many of the textures found online were too bright and did not go well with the rest of the buildings/settings. If I was to repeat this unit I would have definitely started off my research with searching for more possible textures/ materials I could have used instead as replacements.

During my research I have looked up pictures of multiple other people's work who have shard it on the internet and/or games. The most reoccurring theme I have noticed is that they create everything out of wood and rope. Because of this I decided to include this idea into my own models, however also included stone texture for the main base of the house to make them seem more sturdy. Another thing that I have observed is how most maps created by other people only use one type of tree; the palm tree, for the beach parts of my island I decided to incorporate this idea also however used other tress high up on the mountains.
I took most inspirations for my models from the image to the right and first image above. I wanted my models to look realistic yet still with the hint of fantasy.
From what I have gathered in my research the Republic of Pirates is the organization for the base or stronghold run by privateers-turned-pirates in Nassau on New Providence island in the Bahamas for eleven years from 1706 until 1718. Although it is not a state or republic in the usual sense, it was governed by its own informal 'Code of Conduct'. The activities of the pirates caused havoc with trade and shipping in the West Indies, until governor Woodes Rogers reached Nassau in 1718 and restored British control.